Workflow Editor
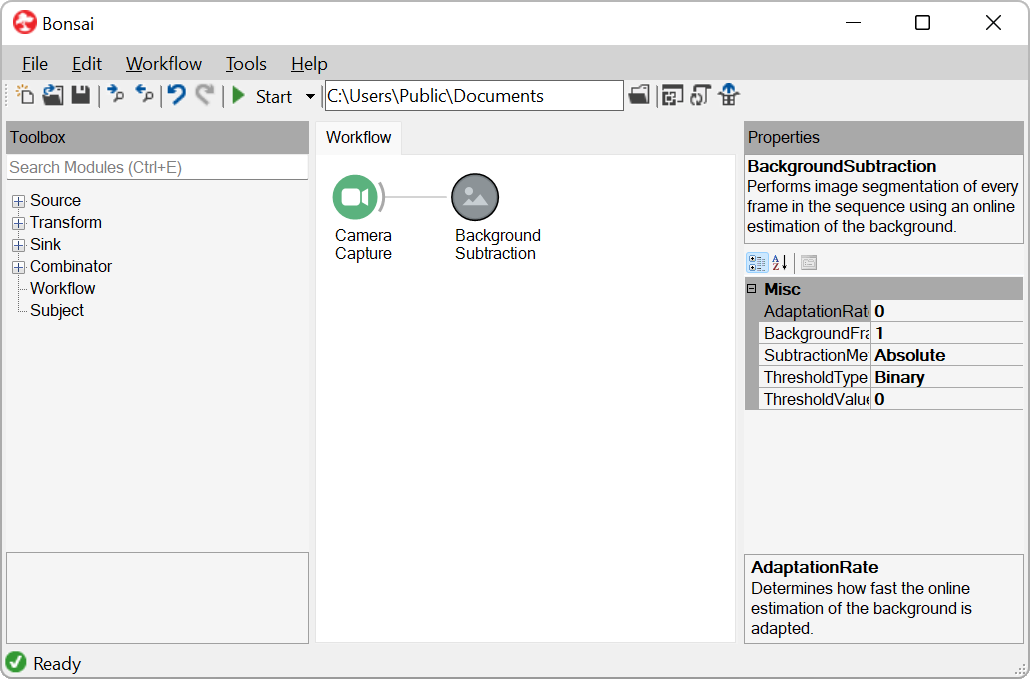
When Bonsai starts you will be taken directly to the workflow editor. This is where you can create, configure, and run Bonsai workflows. The editor is composed of four main panels: Toolbox, Workflow, Explorer and Properties. These are described in more detail below.
Toolbox
The Toolbox allows you to search for available operators to place in the workflow. The listing is organized into six main categories:
| Category | Description |
|---|---|
 |
generate event streams from devices or files |
 |
convert or process individual data items |
 |
save data or trigger external outputs |
 |
manage control flow or synchronize parallel inputs |
 |
reusable workflow fragments stored in .bonsai files |
 |
access named event streams defined in the workflow |
Operators inside each major category are further organized by namespaces linked to the packages you have installed. The name of each namespace can give you a hint about what kind of operations or devices can be accessed inside (e.g. the Audio namespace provides access to audio capture devices or WAV file readers).
Once you have found which operator you want to insert, you can place it by double-clicking, dragging it to the workflow or alternatively right-clicking and selecting a specific placement option. See the Actions and Shortcuts section for more information.
Search Operators
Another way to quickly find operators is to use the Search textbox. Any text inserted here is matched against available operators, subjects, or namespaces for a match in any order. This means you can search not only for a specific operator name but also by category names to locate all the operators in a namespace (e.g. try typing Arduino).
Tip
You can directly type and search for operator names when the Workflow panel has the input focus. This allows you to simply start typing an operator name and directly select which operator you want with the up/down arrow keys. Once you have the right operator, press the Enter key to place it. You can repeat the process multiple times to very quickly chain a sequence of operators.
Another useful function of the Search textbox is to find existing instances of the selected toolbox operator in the workflow. Once you select an operator in the toolbox, you can use the Find Next or Find Previous commands to jump into the next instance of the operator, subject, or workflow extension, starting from the current cursor position. You can also right-click on an operator in the toolbox and select Find All References to list all instances of the operator in the workflow.
Tip
You can browse through the reference documentation to learn more about each operator in the Toolbox by pressing F1 or selecting View Help from the context menu.
Workflow
The Workflow panel is where you combine different operators together to create data processing pipelines. Each operator is represented by a circular node. Nodes can be connected together, forming a directed feedforward graph from left to right. Connections going into a node indicate which operators that node subscribes to (see the Language Guide for an extended discussion).
The most useful action to learn your way around the Workflow panel is right-clicking. This will bring up the context menu for the specific node you selected, or a list of possible actions you can do with the current selection.
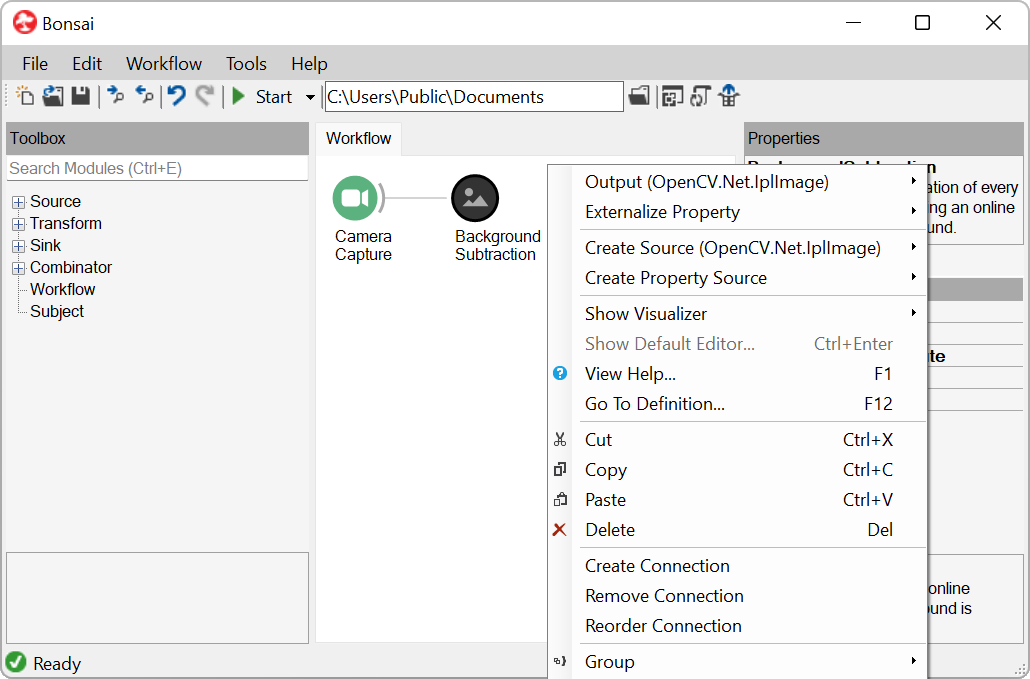
If only one node is selected, the Output menu item will display the type of the elements emitted by that operator sequence.
Tip
If the output of an operator is a complex type, you can inspect its public data members. Clicking on any of the sub-items will automatically place a new MemberSelector operator to pick the specified data member from the output of the node.
The context menu also allows you to externalize public properties of the operator as explicit nodes in the workflow using the Externalize Property drop-down menu. Once a property is externalized, you can connect other nodes in the workflow to it so you can change the value of the property dynamically (see the Property Mapping section for more information).
Finally, it is possible to group nodes, both for organizing large workflows, and to define higher-order operators. The most basic grouping is the GroupWorkflow which allows you to encapsulate a workflow fragment inside a single node. Any group can be assigned a Name for ease of reference and a Description for documentation. Any named properties which are externalized from nodes inside the group will be shown as properties of the group node itself on the top-level workflow.
Note
You can use GroupWorkflow nodes to document your workflow by adding names and descriptions inline with operator chains. These can help readability of a workflow and no additional processing cost is incurred by the use of GroupWorkflow nodes.
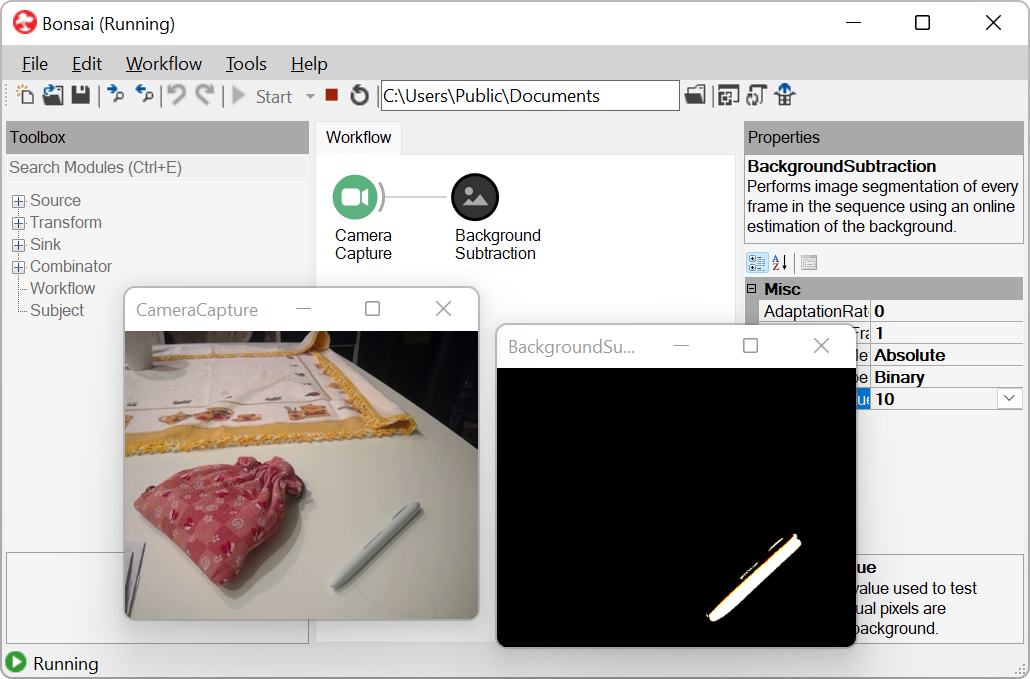
Type Visualizers
Type visualizers allow you to inspect online the data that is generated from a specific node during the execution of the workflow. They are useful to visualize the result of specific operations or to debug the behaviour of the workflow itself.
Assigning visualizers
Types can have more than one visualizer. You can choose the active type visualizer for a specific operator by right-clicking on the corresponding node and selecting from the available options in the Show Visualizer menu.
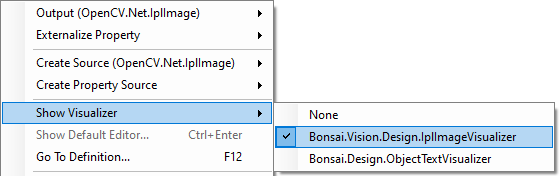
For example, image streams can be displayed on the screen using the default image visualizer, but you can also select the text visualizer to inspect image parameters such as size, or pixel bit depth. New visualizers can be added by installing new packages.
Visualizer layout settings
If you leave one or more visualizers open when you stop the workflow, the editor will memorize the position and size of each active window. When you run the workflow again, the same visualizer windows will be opened following the memorized layout. These settings are stored in a .layout file within the .bonsai settings folder, allowing them to persist between editor sessions.
Tip
Many visualizers allow you to access more detailed information or advanced configuration parameters by right-clicking on the visualizer window.
Workflow Extensions
You can create and save workflow extensions by selecting one or more nodes and clicking the Save Workflow As... button in the context menu.
Workflow extensions are a powerful way to reuse common workflow patterns across a large project. When you save a new extension it will immediately show up in the Toolbox panel for placement. Placing a workflow extension will create a new IncludeWorkflow operator pointing to the saved workflow. You can place an extension multiple times in the same workflow.
Tip
Like other groups, any named properties which are externalized from nodes inside the IncludeWorkflow will be shown as properties of the include node itself. These properties can have different values across different instances of the same workflow extension, and will be saved as part of the top-level workflow.
All included workflow extensions are read-only, meaning that you cannot change the internal structure of the extension once it is loaded into the workflow, only its properties. If you want to change the implementation of the extension you need to first Ungroup the IncludeWorkflow operator. This will make a copy of the included workflow and place it inside a GroupWorkflow. From there you will be able to modify the internal implementation at will. After you have changed the structure, you can save the extension again using Save Workflow As....
Warning
When you change the structure of an included workflow and save it over the original file, all references to that workflow extension will be automatically reloaded and updated. This ensures that all references to the same extension remain consistent throughout.
Watch Mode
To assist with debugging workflows, you can enable watch mode on individual nodes by selecting an operator and clicking on Toggle Watch in the toolbar. The watch mode provides runtime feedback on whether the operator has an active subscription from a downstream operator, is emitting values, or whether its subscriptions have terminated. Each status is visually annotated with a symbol displayed adjacent to the operator.
| Status | Annotation | Description |
|---|---|---|
| Ready | No subscriptions have yet been made | |
| Active | At least one active subscription but no values have been emitted yet | |
| Notifying | At least one active subscription and emitted at least one value in the last period | |
| Completed | No active subscriptions and at least one subscription terminated successfully | |
| Error | No active subscriptions and at least one subscription terminated exceptionally | |
| Canceled | No active subscriptions and at least one subscription was canceled without termination |
Warning
The watch mode refreshes at a maximum rate of 10 Hz and should not be relied upon to evaluate aspects of workflow behaviour that rely on precise timing.
Warning
As the watch mode does not currently track individual subscriptions, care must be taken when interpreting multiple parallel subscriptions, as the true state of each one may be obscured.
Navigation and Layout
You can take advantage of tabs, windows, breadcrumbs and docked panels to navigate complex nested workflows and organize your workspace.
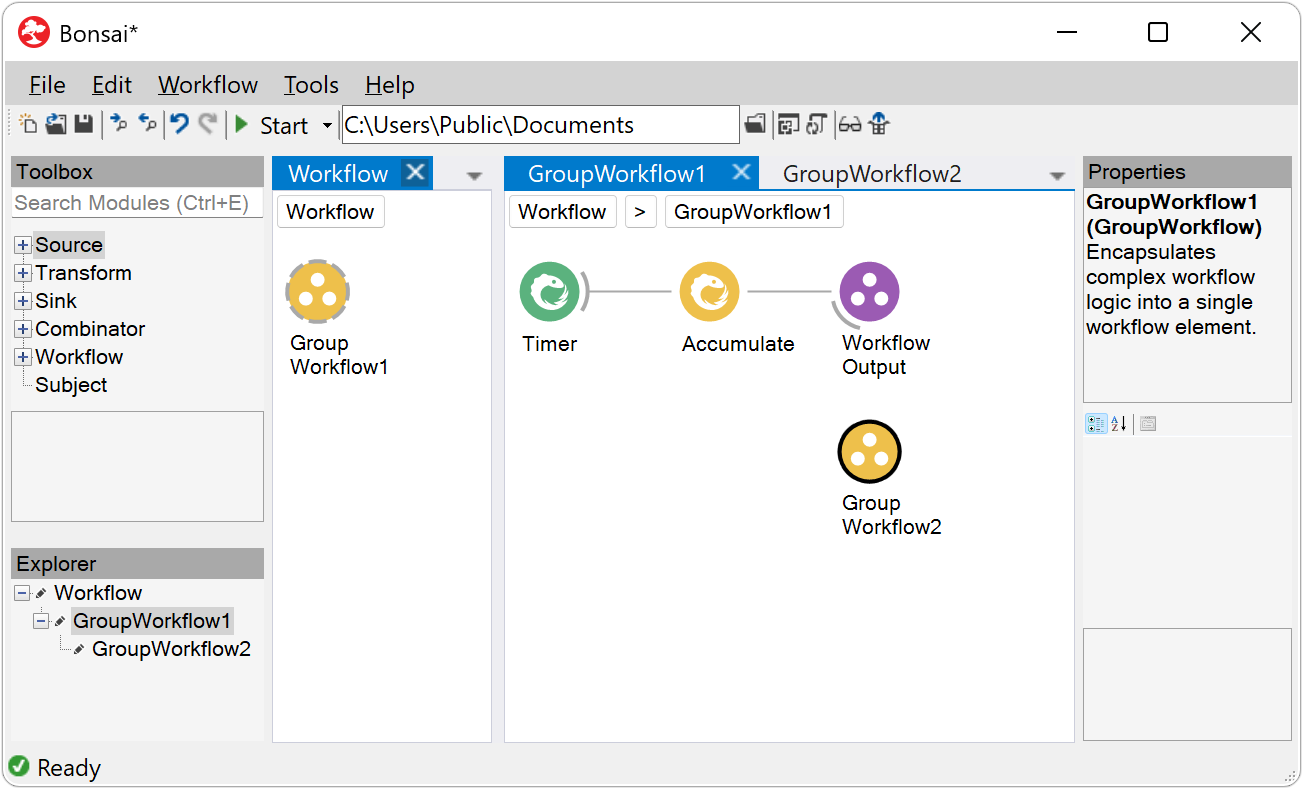
Right-clicking on a nested node such as a GroupWorkflow will bring up the context menu, where you can select the Open in New Tab or Open in New Window commands. You can also access these commands by right-clicking on the tab header or window title bar.
Each tab or window displays a breadcrumb trail at the top, indicating the location of the current view within the nested workflows. Clicking a breadcrumb switches the view to the corresponding workflow, allowing you to navigate between levels.
You can further organize tabs and windows by rearranging them into docked panels. To do this, click and drag a tab header or window title bar towards the center of the screen. A docking guide overlay will appear, allowing you to position the panel in different regions of the workspace. Once the panel has been placed, you can reposition the borders of the panel, as well as create new tabs.
Explorer
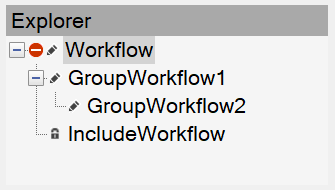
The Explorer panel also supports workflow navigation by providing a hierarchical tree view, similar to a file browser. Each level in the tree corresponds to a nested node. Selecting a node will update the Workflow panel view to display the corresponding nested workflow. You can also navigate the tree by using the keyboard arrow keys and pressing Enter to update the view. To open the node in a new tab or window, right-click on the node label and select one of the options. To expand or collapse the tree view at any level, click on the + or - icon to the left of the node label, or double-click the label itself. Icons adjacent to each label indicate the status of the corresponding workflow:
- ✏️ Editable workflow
- 🔒 Locked workflow (
IncludeWorkflow) - ⛔ Workflow contains errors
Properties
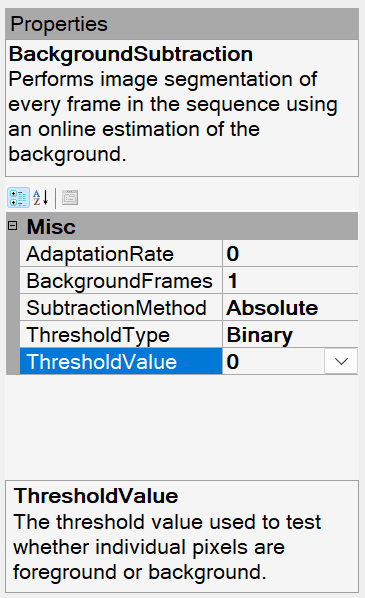
Each operator exposes a set of configuration properties that parameterize the operator's behaviour (e.g., the Timer operator exposes the period between generated values, whereas an image Threshold exposes the brightness cutoff value applied to individual pixels).
The Properties panel will display all the configuration properties which are available for the currently selected operator. A summary description of the currently selected property can be found in the textbox at the bottom of the panel. Similarly, a description of the behaviour of the currently selected operator itself is shown at the top of the panel.
Most properties can be configured simply by changing the text value in the corresponding row of the property grid. Some properties have further specialized editors which can be accessed by clicking the drop-down or dialog button which will be displayed to the right of the property text.
Note
Some operators have even more specialized editor windows such as camera configuration dialogs or media player controls. If such property pages exist for the currently selected operator, the small Property Pages button ( ) above the property grid will become active.
Actions and Shortcuts
Tip
As previously mentioned, right-clicking to bring up the context menu is the most useful action to discover a list of available commands, which will vary depending on the editor panel you right-click in and the current selection.
Below is a summary of the most used actions and shortcuts in the workflow editor:
| Action | Mouse Controls |
|---|---|
| Insert operator | In the Toolbox panel, choose any of these options: Workflow panel Insert options By default the operator will be placed after a node that is selected in the Workflow panel. If a connection can be formed, the two nodes will be connected. To insert the operator before a selected node, hold down the Shift key together with any of the above actions. |
| Replace operator | In the Toolbox panel: Workflow panel, right-click the operator and select Replace |
| Remove operator | In the Workflow panel: Remove |
| Move or duplicate operator | In the Workflow panel: Cut or CopyPaste |
| Create branch | In the Toolbox panel: Workflow panel, right-click the operator and select Create Branch |
| Connect operators | In the Workflow panel, choose any of these options: Create Connection and left-click on the target node |
| Disconnect operators | In the Workflow panel, choose any of these options: Remove Connection and left-click on the target node |
| Reorder operators | In the Workflow panel: Reorder Connection and left-click on the target node |
| Select multiple nodes | In the Workflow panel: Hold Ctrl while clicking on a node to add/remove it from the current selection. Many operations can be performed on multi-node selections or node groups (e.g., delete, create connections, create a node group, etc.). |
| Group operators | In the Workflow panel: Group dropdown On an existing node group, you can do the same action to change the group type. |
| Ungroup node group | In the Workflow panel: Ungroup |
| Open operator editor or node group | In the Workflow panel, choose any of these options: |
| Open visualizer | In the Workflow panel, choose any of these options: Show Visualizer dropdown This action is only available when the workflow is running. |
| Disable node | In the Workflow panel: Disable |
| Enable node | In the Workflow panel: Enable |
| Toggle watch | In the Workflow panel, choose any of these options: Toggle Watch button in the toolbar Toggle Watch from the context menu |
| New tab or window | In the Workflow panel, choose any of these options: Open options Open options In the Explorer panel: Open options |
| Find node | In the Toolbox panel: Find options In the Workflow Panel, choose any of these options: Find Next and Find Previous buttons in the Toolbar Find All References |
| View help | In the Workflow panel: View Help |
| Go to definition | In the Workflow panel: Go To Definition |