Environments
By default, Bonsai is installed system-wide and can be used to run any workflow. However, as projects grow, it is common to have to install new packages to access specific functionality, or update the version of existing packages to get the latest bug fixes and patches.
If you have many projects, you might notice that older projects require specific obsolete package versions which are not compatible with newer projects, resulting in setups that break when the system-wide installation gets updated since only one version of the package can be installed at any one time.
Bonsai addresses these problems by supporting the creation of reproducible package environments. An environment is a self-contained, portable, installation of Bonsai that records a snapshot of all the packages required to run the workflows in your project. This makes it much easier to share a project with other people, or keep track of multiple separate projects in your local machine, and be assured you always have everything you need in the right place.
Environment Basics
The key to creating and updating environments is the Bonsai.config file, which keeps a record of all currently installed dependencies for a specific Bonsai setup. You can find this file in the same location of the Bonsai executable (Bonsai.exe). Anytime you install or update a package, Bonsai will automatically modify the config file.
The contents of the Bonsai.config file are compared with the current state of the Packages folder when Bonsai starts. If there are any missing packages the Bonsai bootstrapper will download them automatically to recover the expected state of the installation folder.
There is a second configuration file located next to the Bonsai.config file called NuGet.config. This file stores a list of all the remote, and local, NuGet package sources where the Package Manager should look for new packages. While this file needs to be included in the environment, most users do not need to modify it.
Portable Method
Tip
We recommend this approach for the casual user.
The easiest way to create a self-contained Bonsai environment is to download the portable version of Bonsai and install the packages which are necessary for a specific project. For example, to share a project that depends on the Vision package:
- Start by downloading the latest Bonsai portable release.
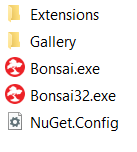
- After extracting all the files from the
Bonsai.zipfile, your folder will look like this:
- Run
Bonsai.exe. During this first run, Bonsai will bootstrap the core dependencies and create an initialBonsai.configfile. - Install the Bonsai - Vision package using the
Package Manager. TheBonsai.configfile will be modified to specify this package as a new dependency. Any additional dependencies which might be needed for the package to run will also be added. - Close Bonsai.
You now have a local Bonsai environment folder that you can keep separate for experiments or share with anyone else who needs it. Alternatively, once you have a modified Bonsai.config file, you can also simply copy the Bonsai.config file into a new portable installation, and the Bonsai bootstrapper will download and resolve the missing or inconsistent packages.
Command-Line Method
Tip
We recommend this approach for users who need to deploy and maintain multiple environments. This approach assumes familiarity with the command-line.
Note
This method supersedes the older template method as its functionality is now integrated into the Bonsai bootstrapper.
We have also provided a command-line tool for "one-click" deployment which installs packages automatically and streamlines the process for creating and restoring environments.
- Download the Bonsai installer.
- When running the installer, ensure that Add to PATH (requires shell restart) is selected within Options.
- Navigate to the folder where you want to create a new Bonsai environment and run this command.
bonsai --init
This command creates a .bonsai local environment folder in your current directory and will also install any core dependencies. To install new packages in this environment, open the Bonsai.exe located in this folder and install the packages you need.
To share this environment with others, all you need are these two files.
NuGet.configBonsai.config
To restore the environment, navigate to the folder containing these files and run this command.
bonsai --no-editor
Adding Local Dependencies
Tip
For new package developers, you may need to install local NuGet packages as dependencies during testing.
The NuGet.config file can be modified to specify new package sources by adding new entries.
For example, to add a new package source named LocalPackages pointing to the Desktop folder:
<?xml version="1.0" encoding="utf-8"?>
<configuration>
  <packageSources>
    <add key="LocalPackages" value="C:\Users\BonsaiUser\Desktop"/>
  </packageSources>
</configuration>
You can also use relative paths if you want to keep package sources relative to the local environment. For instance:
<add key="LocalPackages" value=".\LocalPackages"/>
Note
NuGet.config files can be deployed hierarchically. You can have other NuGet.config files located higher in the file system to specify package sources that should be shared across multiple projects or specific for the local machine. For more information on this and other settings see the Common NuGet configurations documentation page.
Similar to Bonsai.config the NuGet.config file will be used as part of the bootstrapper process when Bonsai.exe starts.
Version Control
To keep track of environments, all that is needed are these two files.
NuGet.configBonsai.config
Since all these files are encoded as text, they are easily version controlled using a distributed version control system such as git. Because of this, we often keep this folder inside our project repository and keep updating it with new dependencies as the project evolves.
To prevent installed packages and other binary files from being tracked, you can add the following lines to the .gitignore file for convenience:
Packages
*.exe
*.exe.settings